
SSL (Secure Sockets Layer) encrypts the connection between your website and its visitors, protecting sensitive data like passwords, personal information, and payment details. An SSL-secured site displays a padlock icon and uses https:// in the browser address bar.
All Cynet hosting plans include free AutoSSL certificates that are issued and renewed automatically.
What Is AutoSSL?
AutoSSL is a cPanel feature that automatically provisions and installs SSL certificates for your domains. Key points:
- Free — Included with all Cynet hosting plans at no extra cost
- Automatic — Certificates are issued and renewed without manual intervention
- Covers all domains — Your primary domain, addon domains, subdomains, and mail subdomains
- Trusted by all browsers — Uses industry-standard certificate authorities
- Auto-renews — Certificates renew before they expire (typically every 90 days)
Prerequisites
- An active Cynet hosting plan
- Your domain pointed to Cynet nameservers (
ns1.cynethost.comthroughns4.cynethost.com) - DNS fully propagated (the domain must resolve to your hosting server)
Checking SSL Status
Step 1: Log in to cPanel
Navigate to yourdomain.com/cpanel or log in via your Cynet client area (see How to Log In to cPanel).
Step 2: Open SSL/TLS Certificates
In the cPanel dashboard, scroll to the Security section and click SSL/TLS Certificates.
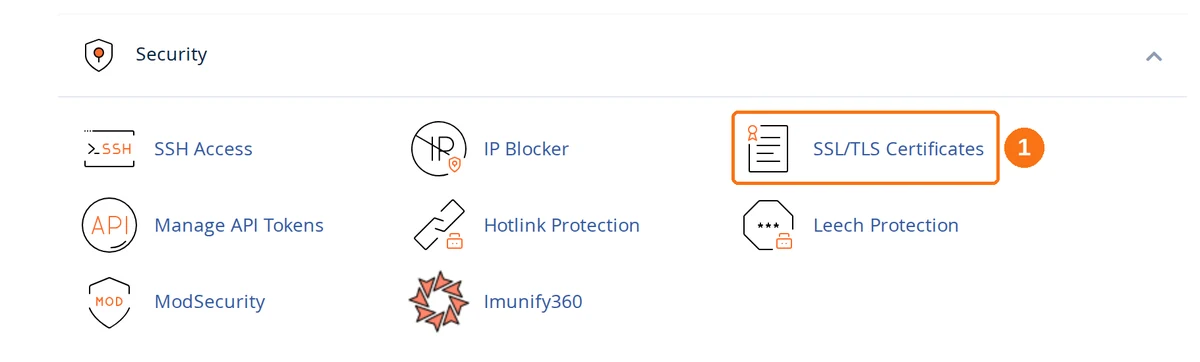
Older guides — including earlier versions of this one — send you to a tool called SSL/TLS Status. There is no such tile in current cPanel. The status list moved inside SSL/TLS Certificates as a tab.
Step 3: Switch to the Status Tab
The tool opens on Wizard, which is for buying and installing a certificate by hand. That is not what you want. Click Status in the row of tabs along the top.
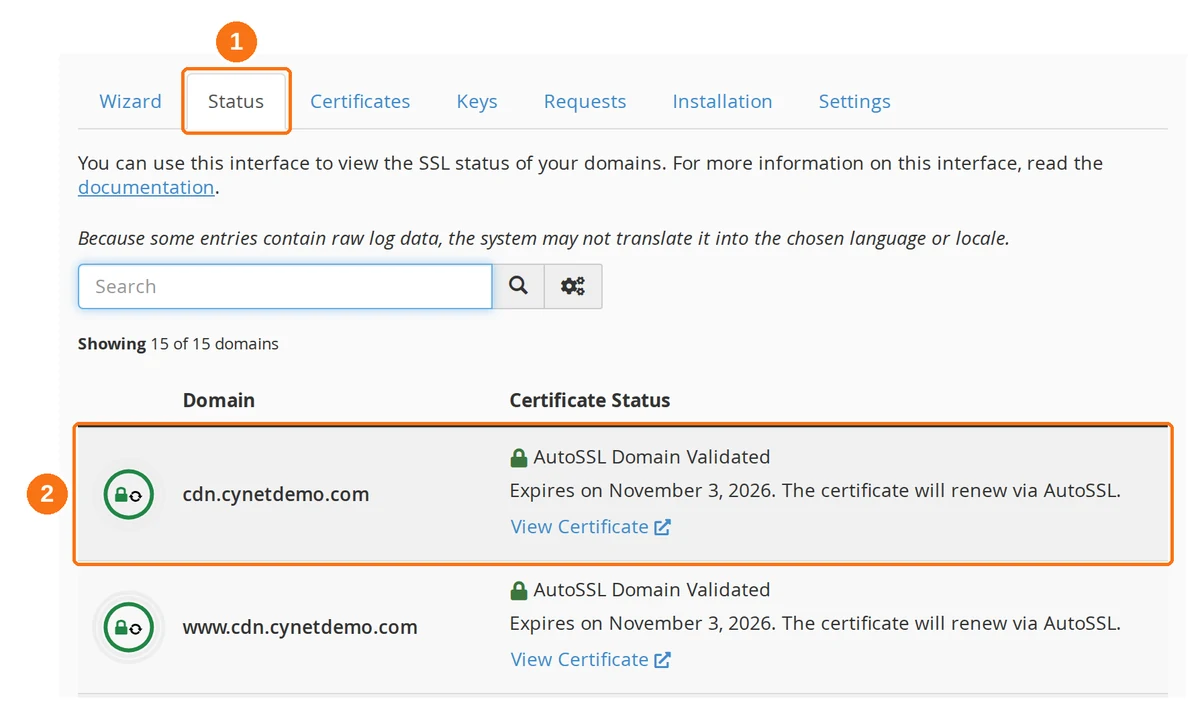
- Status — the tab listing every domain on the account and its certificate.
- A validated domain — a green padlock, AutoSSL Domain Validated, the expiry date, and a note that the certificate will renew via AutoSSL. Nothing more is needed for this domain.
Step 4: Read the Result for Each Domain
Every domain and subdomain on the account is listed, including the service subdomains cPanel creates for itself (cpanel., webmail., autodiscover. and so on). Two outcomes account for almost every row:
| What the row shows | Meaning |
|---|---|
| Green padlock, AutoSSL Domain Validated, an expiry date | SSL is active and will renew automatically. Nothing to do. |
| Red icon, An error occurred the last time AutoSSL ran, on date | Validation failed, with the reason printed underneath. Read it — see below. |
The search settings button beside the search box filters the list by certificate status, which is the quickest way to find the failures on an account with a lot of subdomains.
Can I Run AutoSSL Manually?
Not on Cynet's servers. The Status tab is read-only for you: there are no checkboxes next to the domains and no Run AutoSSL button. That control is a server-level permission, and it is not granted to shared hosting accounts here.
This matters because most SSL guides on the internet — and the previous version of this article — tell you to select your domains and click Run AutoSSL. If you are hunting for that button, stop: it is not hidden, it is not there.
What to do instead:
- Fix the underlying cause — almost always DNS. AutoSSL cannot validate a domain that does not resolve to your Cynet server.
- Wait for the next run. AutoSSL runs on a schedule and retries failed domains on its own, so a fixed domain usually picks up a certificate within a day.
- Contact Cynet support if a domain resolves correctly and still fails after a full day. We can trigger a run for you and read the server-side log.
Reading an AutoSSL Failure
cPanel does not print a tidy status for a failed domain. It prints the raw error from the last run:
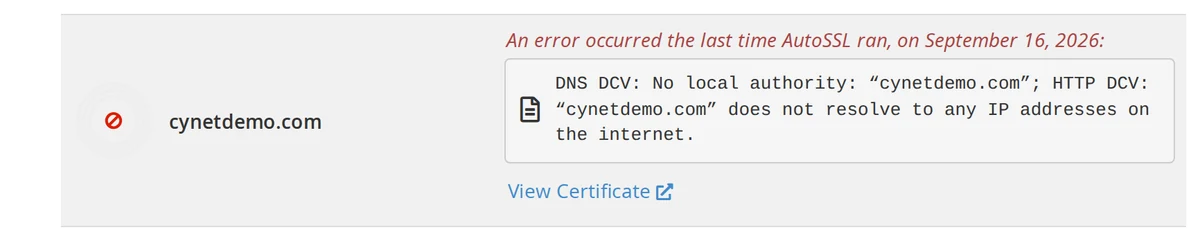
AutoSSL tries two proofs of ownership and reports both: DNS DCV, which looks for a record it controls, and HTTP DCV, which fetches a file from the site. A domain only needs one of them to succeed, so read the whole line before acting.
- "HTTP DCV: … does not resolve to any IP addresses on the internet" — the domain has no public DNS at all. Check that the nameservers are set to
ns1.cynethost.comthroughns4.cynethost.comand that the domain has not expired. This is the common case, and it is a DNS problem, not an SSL problem. - "DNS DCV: No local authority" — this server does not host the DNS zone for the domain, so AutoSSL cannot use the DNS method. Harmless on its own: if the HTTP check succeeds the certificate is still issued.
- A message about resolving to the wrong address — the domain points somewhere else. It is still on an old host, or behind Cloudflare in proxy mode, which hides your server from the HTTP check.
- A message about a failed fetch of a
/.well-known/acme-challenge/URL — the validation file could not be read. A redirect rule, a firewall, or a maintenance-mode plugin is blocking that path.
Forcing HTTPS (Redirecting HTTP to HTTPS)
A certificate does not move anyone to HTTPS by itself — it only makes HTTPS work. Until you redirect, http://yourdomain.com still serves the unencrypted version.
Method 1: cPanel Force HTTPS (Easiest)
Go to cPanel → Domains.
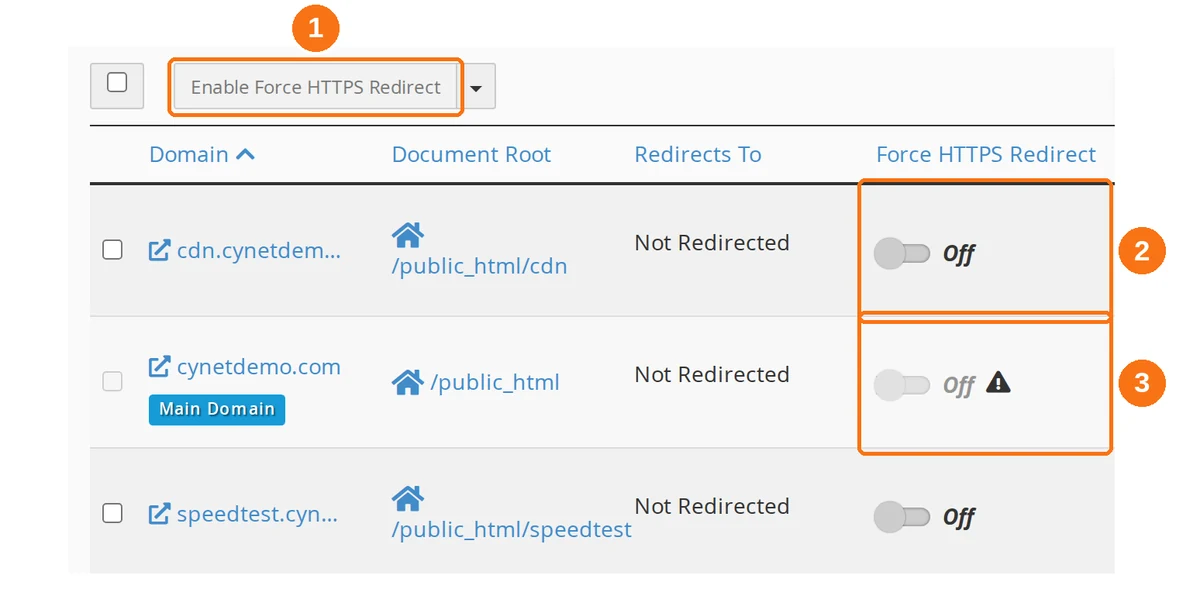
- Enable Force HTTPS Redirect — the bulk action. Tick the domains on the left, then use this to switch them all at once.
- The per-domain toggle — click it to turn the redirect on for a single domain. The change applies immediately.
- A greyed-out toggle with a warning triangle — this domain has no valid certificate yet, so cPanel will not let you force HTTPS on it. Redirecting visitors to a broken certificate is worse than leaving them on HTTP, so sort out SSL first.
Method 2: Via .htaccess
If you prefer manual control, add this to the top of your .htaccess file (cPanel → File Manager → /public_html/.htaccess):
RewriteEngine On
RewriteCond %{HTTPS} off
RewriteRule ^(.*)$ https://%{HTTP_HOST}%{REQUEST_URI} [L,R=301]
Use one method or the other, not both. cPanel's toggle writes its own rules, and a second hand-written redirect on top of them can produce a redirect loop.
Method 3: WordPress Plugin
If you're using WordPress:
- Install the Really Simple SSL plugin
- Activate it → Click Activate SSL
- The plugin handles all redirects and mixed content fixes
Verifying SSL Is Working
After enabling SSL and forcing HTTPS:
- Visit your site using
https://yourdomain.com - Check the padlock — A padlock icon should appear in the browser address bar
- Click the padlock — It should show "Connection is secure" with a valid certificate
- Test with an online tool — Use ssllabs.com/ssltest for a comprehensive check
Handling Mixed Content
If your site loads over HTTPS but the browser shows a warning triangle or a struck-through padlock instead of a plain one, you may have mixed content — some resources (images, scripts, stylesheets) are still loading over HTTP.
How to Fix Mixed Content
- Update internal URLs: Change any
http://yourdomain.comreferences tohttps://yourdomain.com(or use//yourdomain.comfor protocol-relative URLs) - Update WordPress URLs: Go to Settings → General → Change both WordPress Address and Site Address to
https:// - Database search-replace: Use a tool like Better Search Replace (WordPress plugin) to change all
http://references tohttps://in the database - Check theme/plugin files: Some hardcoded HTTP URLs may exist in your theme or plugin files
SSL for Email (Mail Subdomain)
AutoSSL also covers your mail subdomain (mail.yourdomain.com), which secures:
- Webmail access at
yourdomain.com/webmail - IMAP/SMTP connections for email clients (Outlook, mobile apps)
mail.yourdomain.com on the Status tab. It is listed there alongside your website domains, and it fails for the same reasons — most often because the mail subdomain has no DNS record pointing at the server.
Troubleshooting
AutoSSL not issuing for a domain
- DNS not propagated: The domain must resolve to your server's IP. Check with whatsmydns.net
- Incorrect nameservers: Verify nameservers are
ns1.cynethost.comthroughns4.cynethost.com - Cloudflare proxy enabled: An orange-cloud record hides your server from AutoSSL's HTTP check. Set the record to DNS-only until the certificate is issued
- CAA record conflict: If you have a CAA DNS record, it must allow the AutoSSL provider. Remove restrictive CAA records or add the correct one
- Domain expired: Renew the domain first
"Not Secure" warning despite SSL being active
- HTTPS redirect is not enabled — Force HTTPS via cPanel → Domains
- Mixed content — Some resources load over HTTP (see section above)
- Browser cache — Clear cache or test in incognito mode
SSL certificate expired
AutoSSL renews automatically, usually about a month before expiry. If a certificate has actually lapsed, the renewal has been failing silently for weeks — open the Status tab and read the error on that domain rather than waiting for another attempt. Fix the DNS problem it names, or contact Cynet support with the message.
Multiple domains and SSL
AutoSSL covers all domains on your cPanel account — primary, addon, parked, and subdomains. There's no need to install separate certificates for each domain, and you should not use the Wizard tab to buy one unless you specifically need an organisation-validated or extended-validation certificate.