
Most websites and applications — WordPress, Joomla, Laravel, custom PHP apps — require a MySQL database to store content, user data, and settings. This guide walks you through creating a database, a database user, and linking them together in cPanel.
What You'll Create
| Component | Purpose |
|---|---|
| Database | The container that stores your website's data (tables, rows, columns) |
| Database User | The account used to connect to and interact with the database |
| Privileges | Permissions that define what the user can do (read, write, delete, etc.) |
Steps
Step 1: Log in to cPanel
Navigate to yourdomain.com/cpanel or log in via the Cynet client area at manage.cynet.com.my → My Services → Web Hosting → Manage → cPanel Login.
Step 2: Open Manage My Databases
In the cPanel dashboard, scroll to the Databases section and click Manage My Databases.
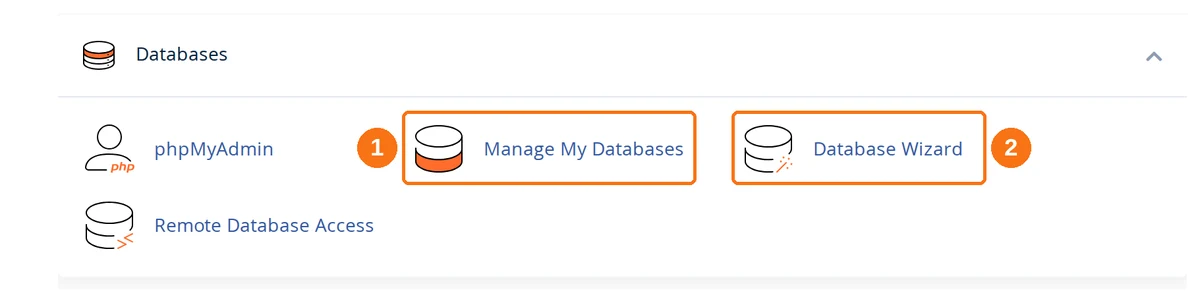
Naming: current cPanel calls this tool Manage My Databases (1). Older guides — and older cPanel versions — call it MySQL Databases. It is the same page. Database Wizard (2) next to it does the whole job in one guided flow; see the wizard section below if you would rather not do the steps by hand.
Step 3: Create a New Database
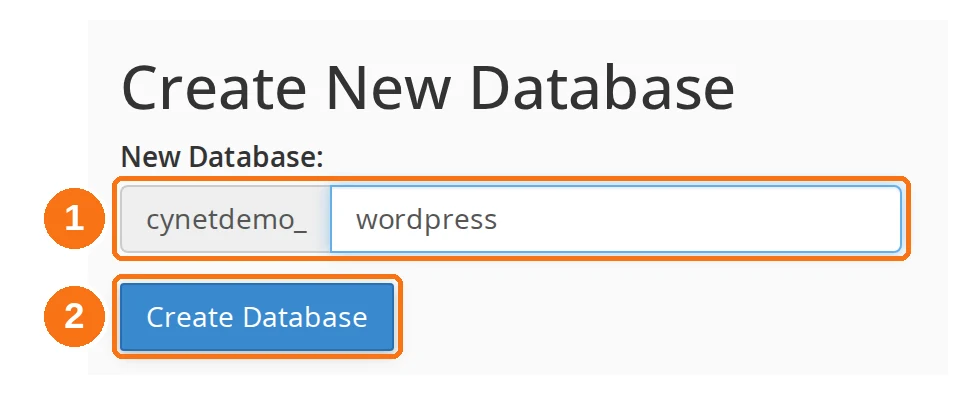
- Under Create New Database, enter a name for your database. Keep it short and descriptive —
wordpress,shop,app - Click Create Database
- cPanel confirms "Added the database ..." on its own page. Click Go Back to return to the tool
wordpress on the account cpaneluser creates cpaneluser_wordpress, and that full name — prefix included — is what goes into your application's config. The whole name is capped at 53 characters.
Step 4: Create a Database User
Scroll down to Database Users → Add New User.
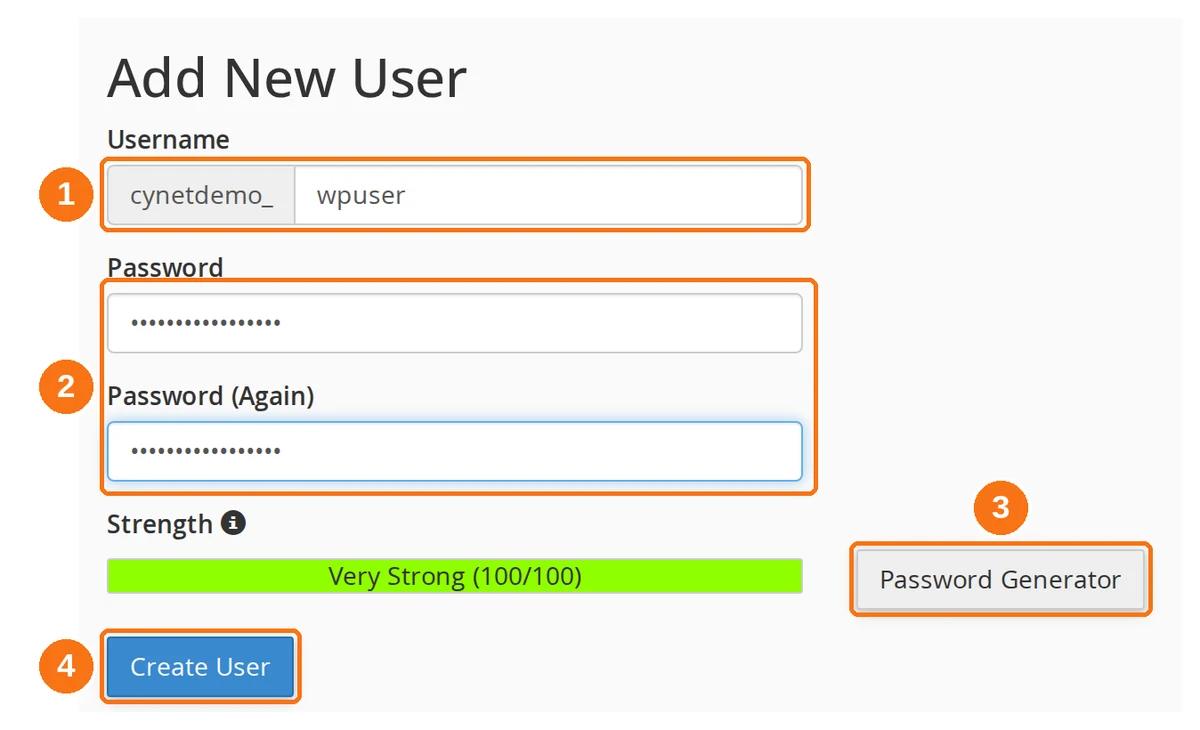
- Username — prefixed with your cPanel username exactly like the database name, and capped the same way
- Password and Password (Again) — type the same password twice. A Strength meter under the fields scores it as you type; aim for the green Very Strong (100/100) band
- Password Generator — click this instead if you would rather cPanel produce a random password. Copy it somewhere safe before you dismiss it; cPanel will not show it to you again
- Click Create User, then Go Back on the confirmation page
Important: The database user password is separate from your cPanel password. Use a unique password for each database user.
Step 5: Assign the User to the Database
A database and a user do nothing on their own — the two have to be linked. Scroll down to Add User To Database.
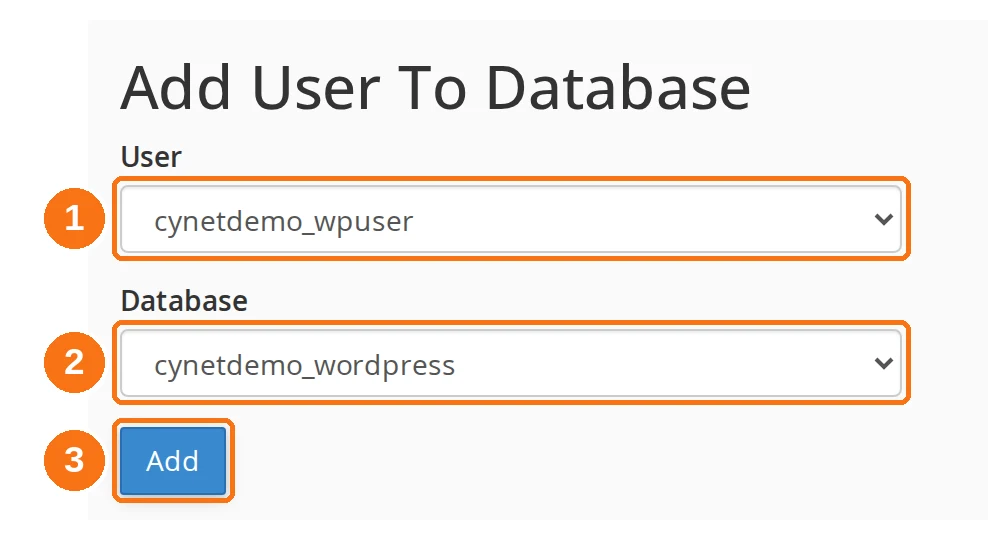
- User — select the user you just created
- Database — select the database you just created
- Click Add
Can't find this section? It only appears once the account has at least one database and at least one user. On a brand-new account with neither, cPanel hides it entirely — finish Steps 3 and 4 first and it will be there.
Step 6: Set Privileges
Clicking Add opens Manage User Privileges for that exact pair, named at the top of the page so you can check you picked the right two.
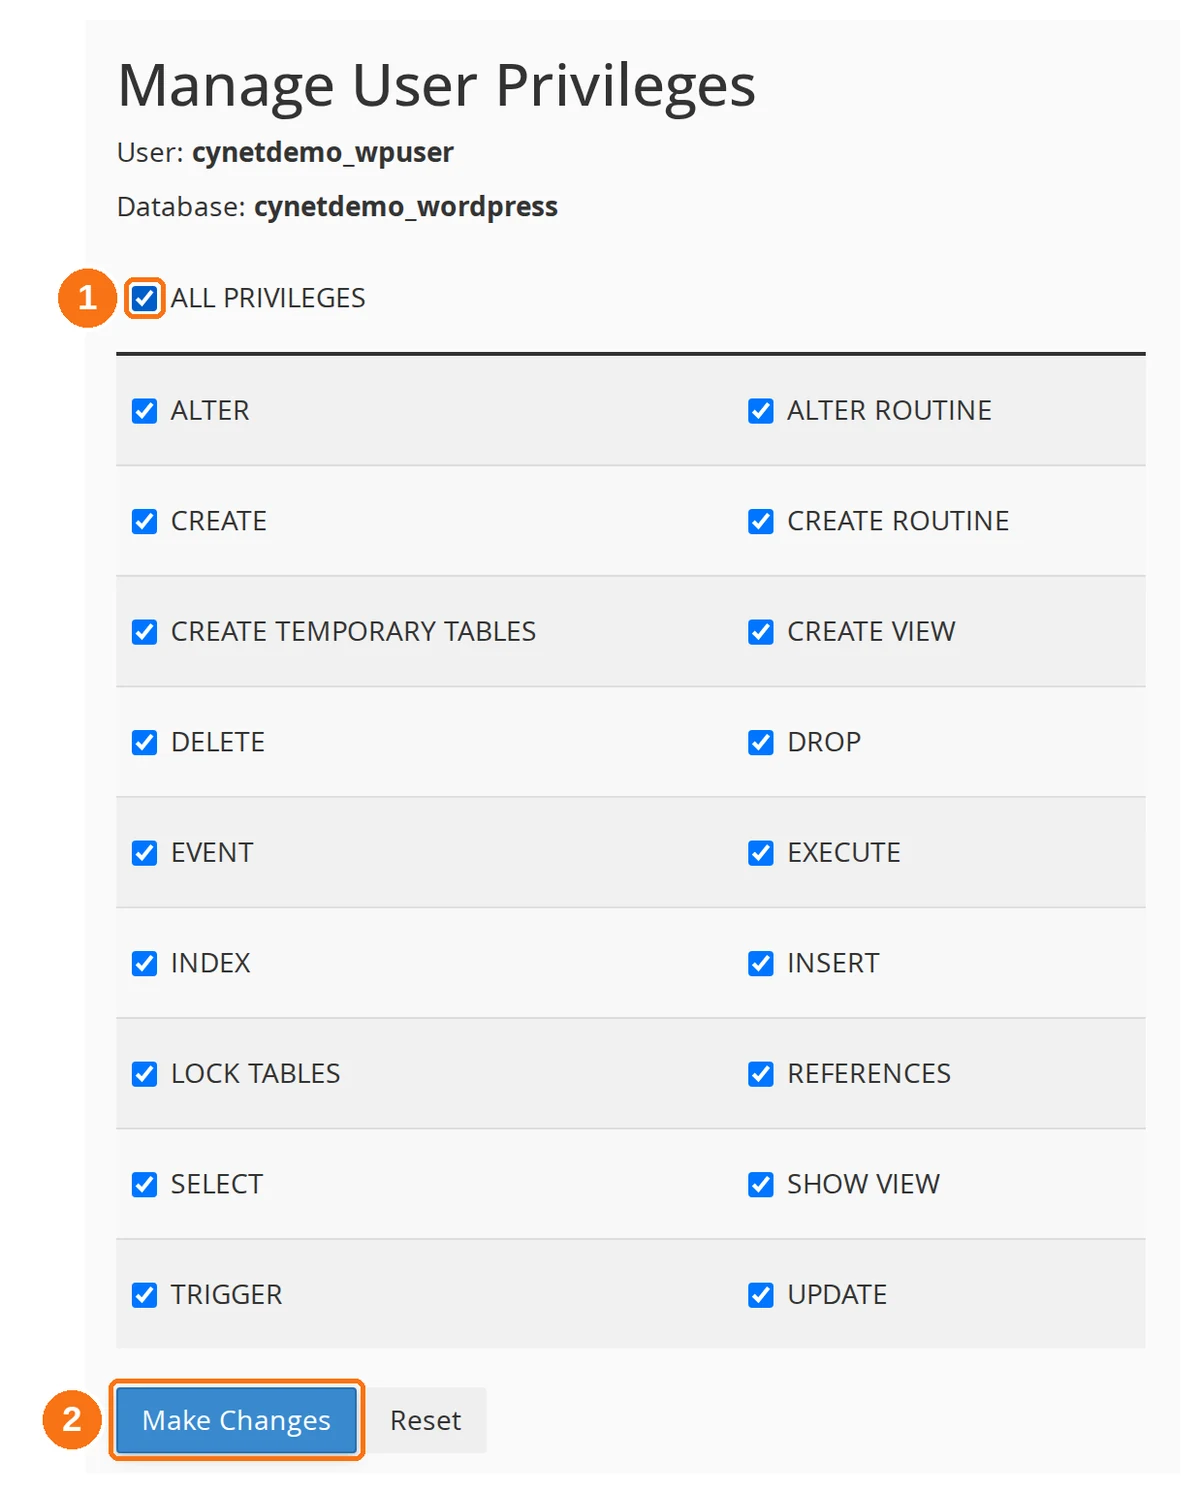
- Tick ALL PRIVILEGES — it cascades down and ticks all eighteen individual privileges for you
- Click Make Changes
For most websites and applications, All Privileges is the correct choice. If you need restricted access for security (e.g., a read-only user), leave ALL PRIVILEGES unticked and select only the individual privileges you need.
Step 7: Check It Worked
Back on the main page, your database now shows the user in the Privileged Users column of Current Databases.
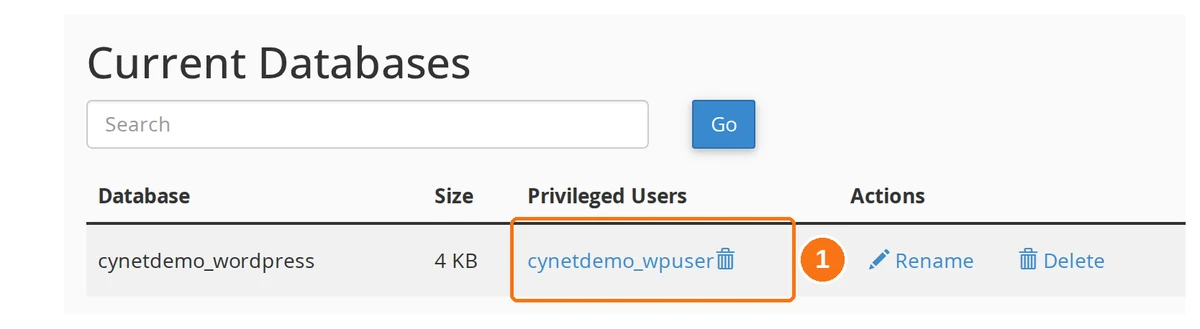
A database with a blank Privileged Users cell is the failure this whole procedure exists to prevent — it is the number one cause of "Error establishing a database connection" after a manual install. If yours is blank, Step 5 did not take.
Step 8: Done
Your database is ready. Note down these details — you'll need them when configuring your website or application:
| Setting | Value |
|---|---|
| Database Name | cpaneluser_yourdbname (full name including prefix) |
| Database User | cpaneluser_yourusername (full name including prefix) |
| Database Password | The password you set in Step 4 |
| Database Host | localhost |
Faster: Use the Database Wizard
Database Wizard, in the same Databases section of the dashboard, is cPanel's guided version of Steps 3 to 6. It asks for the database name, then the username and password, then the privileges — in that order, one screen at a time — so there is no way to end up with a database and a user that were never linked.
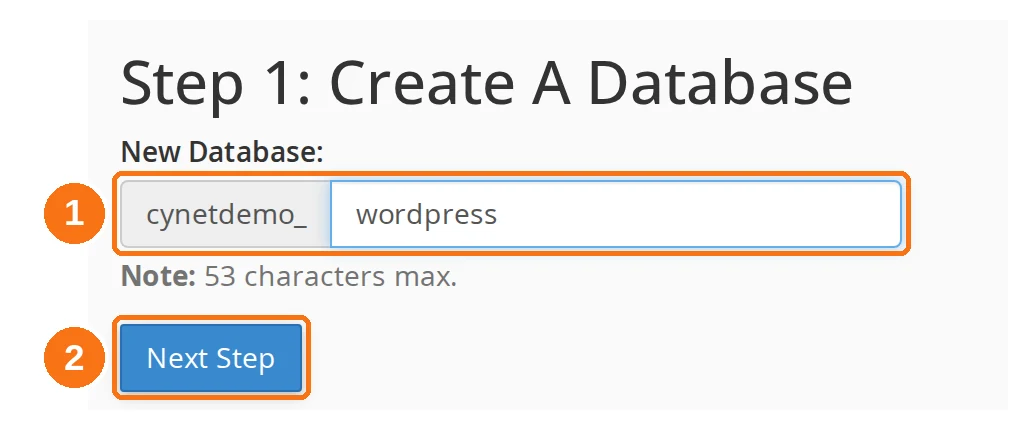
- Enter the database name (1) — same username prefix, same 53-character limit
- Click Next Step (2)
- The next screen asks for the username and password of the database user
- The screen after that asks for the privileges — tick ALL PRIVILEGES
Using the Database in Your Application
WordPress (wp-config.php)
When installing WordPress manually, enter these values in wp-config.php:
define('DB_NAME', 'cpaneluser_yourdbname');
define('DB_USER', 'cpaneluser_yourusername');
define('DB_PASSWORD', 'your_database_password');
define('DB_HOST', 'localhost');
Tip: If you install WordPress via Softaculous or WP Toolkit, the database is created automatically — you don't need to do this manually.
PHP Application
Connect to the database using PDO or MySQLi:
$host = 'localhost';
$dbname = 'cpaneluser_yourdbname';
$user = 'cpaneluser_yourusername';
$pass = 'your_database_password';

$pdo = new PDO("mysql:host=$host;dbname=$dbname;charset=utf8mb4", $user, $pass);
Laravel (.env)
DB_CONNECTION=mysql
DB_HOST=localhost
DB_PORT=3306
DB_DATABASE=cpaneluser_yourdbname
DB_USERNAME=cpaneluser_yourusername
DB_PASSWORD=your_database_password
Managing Your Database with phpMyAdmin
After creating the database, you can manage it (create tables, import data, run queries) using phpMyAdmin:
- Go to cPanel → Databases → phpMyAdmin
- Select your database from the left sidebar
- Import a
.sqlfile to populate the database - Export the database as a backup
- Create tables and manage structure
- Run SQL queries directly
- Browse and edit data
Importing an Existing Database
If you have a .sql database file to import (e.g., from a migration or backup):
- Open phpMyAdmin in cPanel
- Select the target database from the left sidebar
- Click the Import tab
- Click Choose File and select your
.sqlfile - Leave the default settings (Format: SQL)
- Click Go
Upload limit: phpMyAdmin typically allows files up to 50–100 MB. For larger databases, upload the.sqlfile via FTP and import via SSH:mysql -u username -p database_name < file.sql
Deleting a Database
If you no longer need a database:
- Go to cPanel → Manage My Databases
- Scroll to Current Databases
- Click Delete next to the database you want to remove
- Confirm the deletion
Warning: Deleting a database permanently removes all data. Create a backup first if you might need the data later.
Troubleshooting
"Error establishing a database connection"
- Verify the database name, username, and password in your application's configuration file match exactly what's in cPanel (including the prefix)
- Confirm the user is assigned to the database with privileges (Steps 5 and 6) — creating both without linking them is the most common cause
- Ensure the database host is set to
localhost
"Access denied for user"
- The user may not have been assigned to the database — check the Privileged Users column in Current Databases, and if it is blank, redo Steps 5 and 6
- The password may be incorrect — reset it in Manage My Databases → Current Users
- Privileges may not be set — reassign the user with All Privileges
Database not showing in phpMyAdmin
- The database user may not have privileges — reassign the user to the database
- Try logging out and back in to cPanel to refresh the session
- Verify the database exists under Current Databases on the Manage My Databases page
"Can't create database — quota exceeded"
- Your hosting plan has a maximum number of databases. Check your plan limits in the Cynet client area
- Delete unused databases to make room, or upgrade your plan